
- Recurring templates: This guide reviews these templates.
-
Schedule templates:
- Templates with employees and shifts assigned.
- These must be applied manually only by an administrator, manager, or scheduler.
- Please see article for standard templates here.
How to create a recurring template
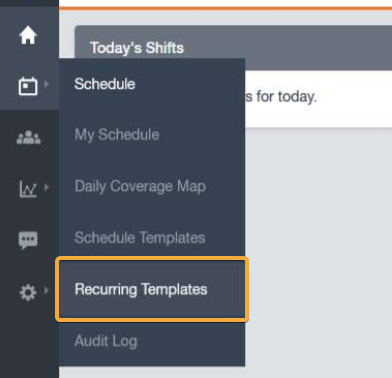
1. Onced logged into Paycor Scheduling, in the left navigation menu, click Schedules and select Recurring Templates. The Recurring Templates screen appears.
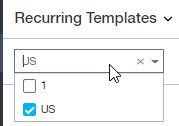
2. If you have more than one Location setup in Paycor Scheduling, to view the the templates for other locations, at the top-left, click the group location filter for options:
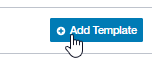
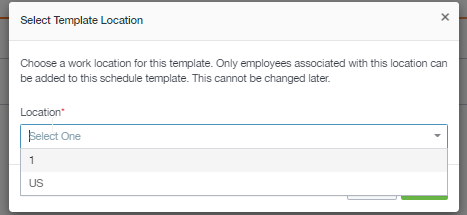
3. At the top-right, click +Add Template and select the location for the new
template. The location appears for the template you selected. (The prompt for 'Select Template Location' will appear if you have more than 1 Location, if you have less, skip to Step 4).
4. Click Next to confirm the new template.

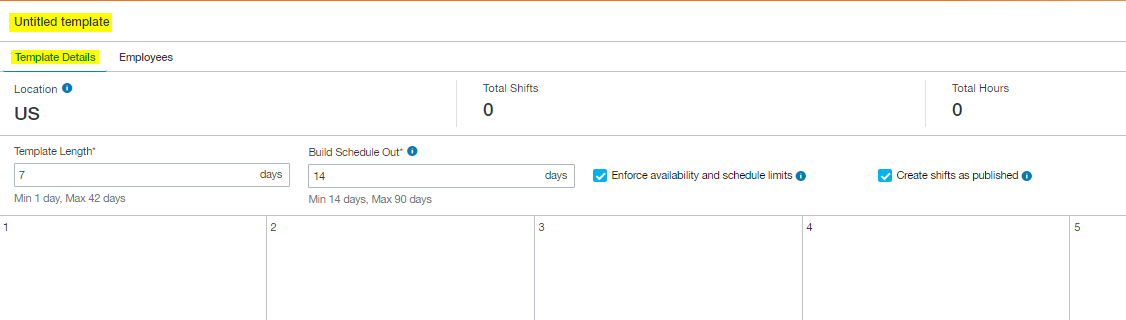
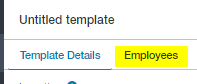
5. The new template screen defaults to the Template Details tab and is titled
Untitled template. Complete the appropriate fields listed in the Template details
tab and then click Save and close to create the template.
Important: You must click Save and close to save changes. If you click Cancel,
your updates are not saved.
Untitled template:
- Click on this line to rename your template.
- You can also leave the Untitled template name but if you create more templates, it might be difficult to identify multiple untitled templates.
Template details tab:
- Complete this first.
- It is recommended that you first define your rules and shifts, and then as a next step you assign employees to the template.
Employee tab:
- Assign employees to the template you're creating.
Stats bar:
- In the sample screen here, the bar starts with Location / US.
- Shows you the location for the new template, the number of total shifts,
the number of hours on those shifts (note that unpaid breaks will always
be deducted from the total number of hours) and the number of
employees assigned to the template.
Template length:
- Defines the length of your template in days.
- It does not necessarily have to match with weeks, such as 7 days, 14
days, etc. - This relies on the rotation you set up.
-
Examples:
- If you need a simple weekly schedule that just repeats week to
week for your employees, then select a seven (7)-day length. - For other rotations use a different value. In the case of four (4)-on
/ four (4) off rotation, create and eight (8)-day template.
- If you need a simple weekly schedule that just repeats week to
Build Schedule Out:
-
Defines for how much in advance you wish the system to apply your
template rotation.
-
Example:
- If you always wish to have 30 days of schedule in the system,
irrespective of how long your rotation is, then enter 30 here. The system
automatically updates the template to match the entered value here and
stops when it reaches out that limit. - When the situation applies in the future (next day) it adds an extra day
making sure that you always have the number of days that you
define here.
- If you always wish to have 30 days of schedule in the system,
-
Example:
Enforce availability and schedule limits:
- When applying a template automatically, the system does not override
any potential warnings. If this option is not marked the system will
override any potential warnings received when adding shifts to the
schedule. -
The system generates warnings when:
- A shift overlaps with un-availability overlaps with another shift reaches
any of the schedule rules configured on an employee’s profile under
Schedule Rules section. - Overlap of a shift with a holiday in the system.
- The system tries to set an employee over the weekly or daily hour cap
(go to Settings > Schedule > Schedule Warnings).
- A shift overlaps with un-availability overlaps with another shift reaches
Note: The system will never override someone’s approved PTO request, no
matter of how this setting is configured.
Create shifts as published:
- When this option is marked then the system automatically publishes a
shift when applying a template. - When this option is not marked, when a template is applied, all shifts will
be in a draft mode and you must manually publish them.
Schedule grid:
- This is where you create shifts.
- The shift grid on the screen expands or collapses depending on how you
configure the Template length field above it.
Notes:
- The days listed here are abstract days and not defined (such as
Monday, Tuesday or any other day in the week). - The days depend how each employee is assigned in the next steps in
this guide, including when the template rotation starts applying for each
employee and the start date of the template
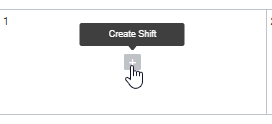
Creating a Shift for a Template
After creating your new recurring template, follow these steps to add shifts:
1. On the Template screen, on a particular day in the calendar, click the plus icon
(+) to create a shift. The Click to Name this shift popup appears.
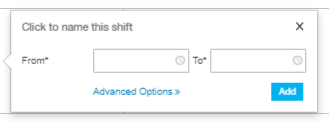
2. To quickly create a shift, enter the From and To dates and click Add.
3. To assign a work site, break, or note click Advanced Options >> and update
those fields when the popup appears.
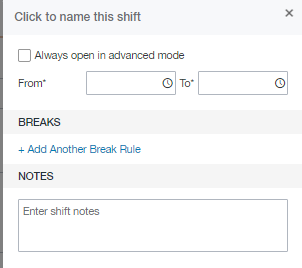
4. Click Add.

Important:
-
Do not enter employee-specific information here! A shift created here will
be applied to all employees assigned to the template -
Shift information should be generic enough that it covers all employees that
you plan to assign to such a template.
- For shifts that are specific to each individual employee, consider using our Schedule Templates, rather than Recurring Templates.
Applying Employee Details to a Template
After creating your new recurring template and adding shifts to it, follow these steps to
assign some employees to the shift rotation.
1. On the Template screen, at the top-left, click the Employees tab.
2. On the Employees screen, at the top-right, click + Add Employees. The Add
Employees popup appears with a list of employee names.
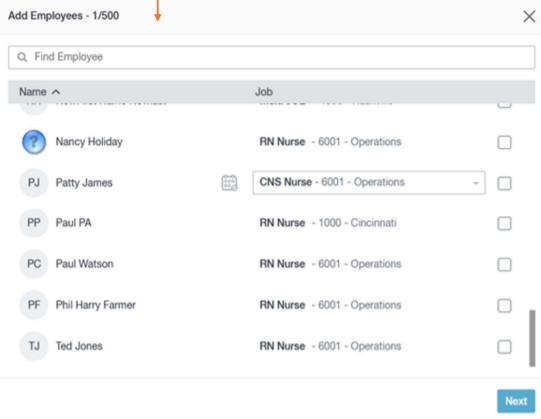
3. For the appropriate employee, mark the checkboxes to the right of each name,
and then click Next.
Notes:
-
At the top-left of the popup, you can see how many employees you’ve
already selected for the template on top of this popup window. The sample
screen here shows 1/100. -
For employees with multiple job or department combinations:
-
- A menu appears for you to select the appropriate ones.
-
The sample screen here shows the menu for Patty James.

-
-
In the same example here, schedule icon appears to the left of Patty’s name
indicating Patty is already assigned to another template rotation to help you
avoid scheduling employees for multiple rotations at the same time:- The icon only means that her name exists on another template, but it
does not check if it’s for the same period as the template you’re currently
working on, since you’ll be setting up those dates on the next step. -
If you hover over the icon you’ll see the name of that other template
where Patty is assigned.
- The icon only means that her name exists on another template, but it
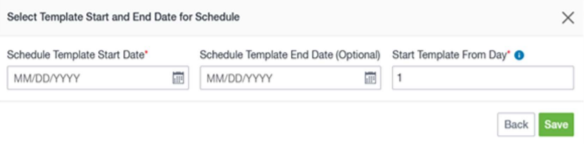
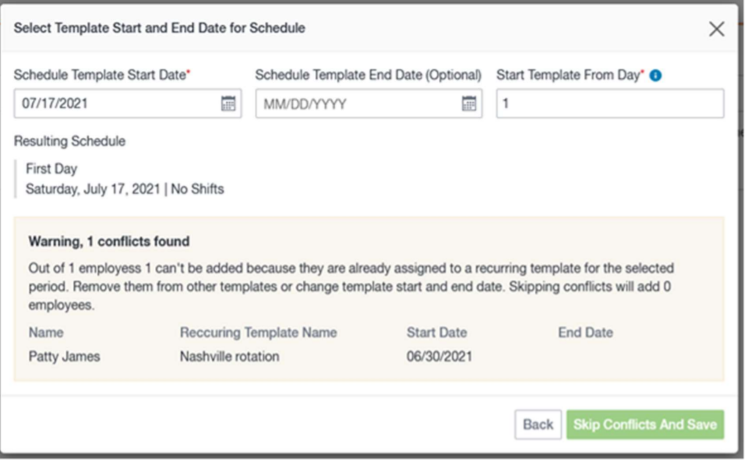
4. After selecting employee names, select the start and end dates for the Schedule
and click Save:
- Select the start date of the template for the selected employees.
- An end date is optional. If you skip the end date, the template continues to repeart until you delete it.
5. If settings are different for some employees you selected, save these default
settings for most employees, and then edit specific employees in the next step.
Notes:
- If there are any conflicts, they are listed like shown here in the sample screen.
- In this sample, the warning means Patty is already on another template for the
date range that overlaps with the date range we selected for the new template. -
If there are conflicts for multiple employees:
- The system allows you to click Skip conflicts and save which adds only
employees with no conflicts - In the sample, because only one employee has a conflict, the Skip
conflicts and save field is disabled.
- The system allows you to click Skip conflicts and save which adds only
6. After you resolve all the conflict (or you skip those), the list of assigned
employees appears like in this sample screen:
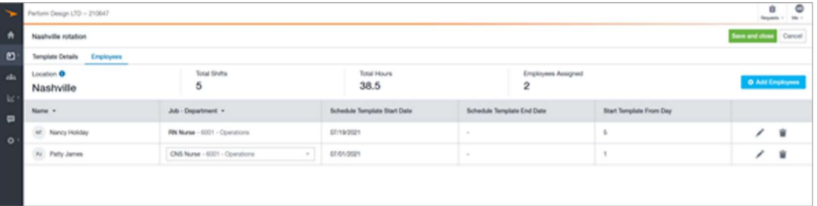
7. To apply additional employee edits:
You can edit any of the information shown:
- Effective start date
- Effective end date
- Template start date
-
Job/department combination for all shifts from the template:
- To assign a few shifts from the one job/department combination on the template to a different job/department combination, for a given Job/department, click the field and select Custom job and department mapping.
-
Next, click Map to assign each job/department criteria to individual shifts
from the template.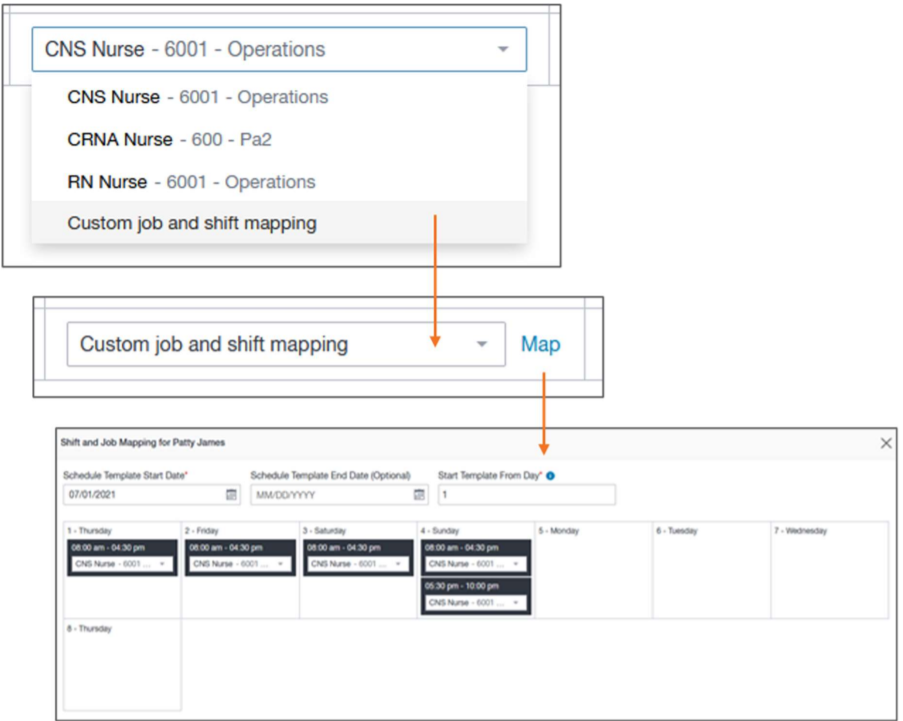
8. When complete configuring all of the employees, at the top-right click Save and
close. This occurs:
- A confirmation message notifies you the template will be applied in the next 24
hours. - This means the template is not applied immediately to the actual schedule.
- In most cases it is quicker than 24 hours because of a systematic overnight
update that applies all templates.
Important Information
- After creating a recurring template, it is not immediately available because they are
added to Paycor Scheduling during a systematic update overnight - Shift times on the template match each employee’s particular time zone.
- The time zone of the recurring template creator matters:
-
If you are in a different time zone than an employee, when you create a recurring
template, you must verify those shifts match the manager’s time zone (as
applicable):
-
Example:
- A 9:00 AM – 5:00 PM shift from the template will be applied
whenever 9:00 AM – 5:00 PM occurs in an employee’s time zone
(not yours) -
The rest of the system usually aligns time stamps according to a time
zone of a person looking at the schedule.
- A 9:00 AM – 5:00 PM shift from the template will be applied
-
Example:
-
A system update will never go back to change the shifts that were already built out
on the schedule.
- The system update will apply a template as-is and store the last date
completed so the next time it runs it just continues from that date. - This means that if any change is made to the template after it has been
applied to a certain period, then that change will be reflected only going
forward from the next run, but what’s already applied to the schedule will
stay as is.
- The system update will apply a template as-is and store the last date